Search This Blog

Friday, February 25, 2011

BANISHED: The Mystery of Homemade Pasta


Tender, Delicious Pasta
Pasta making has always intimidated me. Creating this essential food staple from only two simple ingredients, flour and eggs, seemed almost counterintuitive and mysterious to me. However, I have always wanted to make my own pasta. So last year, I bought a shiny new pasta maker, despite the fact that all those cranks and rollers and cutters looked slightly dangerous.  I signed up for a pasta making class at Chef Central in Hartsdale, New York, and brought the pasta maker with me. The teacher at Chef Central  was quite patient, showed me how to use it and I learned to use it quite well.  It is actually quite easy.

Pasta made WITHOUT a machine is not so easy.   My Nonna used to make pasta herself, and there was no machine.  The traditional Italian Abruzzese housewife made the pasta with nothing more than a long, thin rolling pin and plenty of kneading action, resulting, I expect,  in very strong forearms.  I remember long strands of pasta hanging from improvised racks, flour everywhere, a big mess.

 Pasta Machine
For this posting I will try to demystify pasta making so if you ever decide to do it, you will know what ingredients to buy, how to prepare it,  what to expect, and what to avoid.

Preparing to Make Pasta
When setting out to make my own pasta, I researched the ingredients. The most helpful source was in a cookbook by Marsella Hazan, entitled Essentials of Classic Italian Cooking.  Even though the pasta class was helpful, they had made the pasta dough ahead of time.  So all I knew what how to operate the machine.  I really needed to find out how to actually make a good dough on my own.

First I researched the kind of flour needed. I found in the Fairway Market the soft wheat "00" (doppio-zero) flour used by most Italian cooks to make pasta. Soft wheat 00 flour is silky smooth and similar to talcum powder in texture, slightly different than commonly used all-purpose flour found in every supermarket.  Although I used this flour according to Hazan all purpose flour makes a fine product and is in some ways superior as the pasta has more body but is still very tender.

I also found out that semolina flour, or hard durum wheat flour, is not used in homemade pasta as it is very difficult for the home cook to work with. It is only suitable for factory made pasta.  In fact, you will never find manufactured pasta made with soft wheat flour as it is much too delicate. Even those pastas that purport to be fresh, but are in a cellophane package, are not made with soft wheat. They are delicious but still made with durum wheat.

HOME MADE PASTA

Ingredients:
Pasta & Egg "Volcano"

1 cup "00" or all purpose flour (approximate)
2 eggs

Makes approximately 3/4 of a pound of pasta, or three good-sized  servings.

Beating the Eggs
Prepare a clean work surface. I use a large wooden cutting board not used for meat.  Marble or granite is a poor surface because it is too cool and will cause the dough to contract.

Kneading
Place the flour on the cutting board and make a mound, as tall as you can make it.  Hollow out a space in the center, like a volcano, and break the eggs into the center.  Beat the eggs with a fork, taking care not to spill  the eggs over the edges of the center of the mound, for about one minute. With your fingers, draw the flour into the egg mixture a bit at a time, and then shape it into a tight dough.  It is done and ready to knead when you can poke your finger in the dough and it is not sticky. If too sticky, just add more flour.
Shaping
Cutting into Sections
When it feels right, nice and smooth, flatten the dough and knead.  How to knead: flatten the dough into a disk and fold it towards you, pushing against the mound with the heels of your hands with your fingers bent. Keep doing this, folding and kneading, in a clockwise direction, until the dough is smooth, about a few minutes. The Italian housewives kneaded for a much longer time but the pasta machine takes care of most of the kneading for you. After kneading, form the dough into a shape the size of a sausage link, and cut it into six pieces. Flatten a piece with your hand, covering the rest with plastic wrap to avoid drying.

Through the Roller, Over and Over
Flattened Dough in Machine
Now you are ready to use the pasta maker.  Carefully read the manufacturer's instructions as each manufacturer creates a machine with a slightly different design. Attach the pasta maker to a table or counter using the c-clamp or vise provided with the machine, and lay a clean dishtowel on the end where the pasta will come out. Take the flattened disk and feed it into the roller end of the pasta maker at the widest setting, 3 or 4 times, then the next wide setting, several times.  You will see the dough come out thinner and thinner. My pasta maker has 8 settings, 8 being the widest and 1 being the thinnest. When I set the gage at 2, the pasta was too thin and delicate.  I found 4 or 5 to be the best thickness.
Wide Noodles

Ready for Machine!
You can feed the flattened dough through the pasta cutters on the machine, or you can cut them yourselves with a pizza or ravioli cutter, or you can roll the pasta lengthwise and slice it with a knife for some nice long noodles.  This takes some skill, so I prefer the machine at this point. 

Thin Noodles
Pasta makers usually have two cutters, allowing you to choose between wide pasta, or fettucini, and narrow pasta, which comes out looking like spaghetti but with more of a squarish shape.  While carefully feeding the flattened and thin pasta dough though the cutters, pull the strands out gently with your hand and place them on a clean towel.  You can make them fresh or dry them. If you prefer to dry them, you let the pasta rest on the towels until they dry a bit but are still pliable, and then take a few strands and wind them around your fingers to make a small nest.  I placed these nests in a plastic container, uncovered, until totally dry. You can only store them when they are totally dry otherwise they will form mold. I used mine, the fettucine, the first night, and the pasta nests of spaghetti, the next night. They did not dry completely; they were brittle almost like boxed pasta, but way more delicate.

Ooops!  Done
When you are ready to make the pasta, have the table set and the sauce of your choice made, keeping it  hot and ready to serve.  Fill your pasta pot with cold water and add one teaspoon of salt. Bring it to a brisk boil, and all at once,carefully place the pasta in the pot, and stir gently to make sure the strands do not stick together.  It cooks very quickly, taking only a minute or two. Remove immediately when it is at its desired firmness, only determined by tasting, and drain in a colander. Loosen the pasta by shaking the colander a bit.   Do not add olive oil.  Serve in warm dishes...nobody likes cold pasta!

My pasta was very delicate, and held the sauce very well. I couldn't believe I made this pasta from scratch,, just like my Nonna did, so many years ago.

Tuesday, February 1, 2011

Just in time for the Super Bowl!! Cornbread-topped chili; BBQ beef ribs

CORNBREAD TOPPED CHILI and BBQ SHORT RIBS of BEEF
 Easy Super Bowl Party Recipes


Super Bowl Sunday, February 6, will likely be one more of those snowy, icy evenings that we have been enjoying lately, and you might be wondering what dishes you might want to create for your guests that are easy to prepare with a minimum of fuss. Here are two great recipes: Cornbread-topped Chili, and BBQ Short Ribs of Beef. These two dishes, my corn and black bean salsa (July 15, 2010 posting), some frosty beer, chips and dip, and other party what-have-you, and you have yourself a Super Bowl party!

CORNBREAD-TOPPED CHILI

Cornbread-topped Chili
Cornbread-topped Chili is a ridiculously easy dish that looks and tastes spectacular.  It is simply this: thick, spicy beef and bean chili in a baking dish, topped with cornbread batter, baked in a 350 degree oven until golden brown and firm,  topped with shredded cheddar and baked for a few minutes more until the cheese is melted. That's it!  What, you don't have a favorite Chili recipe?  Well, I have one right here for you!  And you don't have a cornbread recipe?  Hold on, you can use a mix!  I used one and it comes out great.

I was leafing through a magazine one day and saw a picture of this dish, and thought it was a great idea.  The chili recipe was not that great, so I thought, why not substitute my own chili recipe? There was a recipe for cornbread, but I know how to make cornbread from scratch, so how hard could this recipe be?  I figured I would give it a try when I had my next party. On that day, I found that I had run out of corn meal flour: the only thing I had was a package of  Penguin (http://penguinfoods.com/) cornbread mix that I had picked up in BJ's on a whim. I had made a few batches over the summer and found it makes some very fine cornbread, cakey and sweet with added corn kernels. Surprisingly, the combination of sweet and spicy hot worked quite well.  I imagine any good mix will work, as well as any good scratch recipe.
Preparing cornbread batter


Spreading the chili
Ingredients:


1 batch of corn bread batter
1/2 cup (less or more to taste)
     shredded cheddar cheese
9-10 cups chili with ground beef and
     beans ( your own, or see recipe
     below)

Spreading batter over chili
  • Preheat oven to 350 degrees
  • Prepare your favorite chili, or use the recipe below. Simmer until thick.
  • Prepare your favorite cornbread mix, or buy a bag of yellow corn meal and follow the directions on the package for one batch of cornbread. 
  • Spoon the chili into a 9 X 13 pan. I like the Pampered Chef stoneware pan. 
  • Spread the cornbread batter over the chili.
  • Bake for for hour, or until golden brown and firm.
  • Take out of the oven, sprinkle evenly with cheddar, and bake until cheese is melted, just two or three minutes.
  • Serve either hot or warm.  I found that you can heat this in the microwave the next day without compromising taste.

The Chili Recipe
First, a word about my chili. This is a family favorite which I have been making for years.  It is not authentic, but it is rich, thick, and spicy. Authentic would mean slowly cooked whole cuts of beef and no beans. I use ground beef and canned beans, sometimes, horrors, I don't even drain them.  It would probably horrify a Mexican cook,  but many so-called Italian dishes would horrify me, however people who make them enjoy them. I make no apologies!
Santoku knife in action
Also some words about some of the cooking tools I used to prepare this dish: a Santoku knife, a new discovery of mine, and an old-fashioned potato masher.  The Santoku knife is a small cleaver-like knife, with a hollow edge which prevents the food from sticking. I never used one before, and I found that it cuts true and straight and made short work of the peppers and onions I had to dice so small.  I recommend it highly, as well as a good chef's knife, which is my workhorse.
Old-fashioned potato masher

The potato masher has many uses: it's not only used for mashing potatoes! In this recipe, I used it for breaking up the ground meat right in the pan as it cooks, and to mash the beans about halfway through the cooking process. I got this one at an antique store in Point Pleasant, New Jersey. It's hard to find this design!


Ingredients:

It must be THICK!
1/2 pound ground beef
2 cans of  red kidney beans, 15.5 oz., I use Goya
2 cans Del Monte (or other brand) tomato sauce,
   8 oz. each
1 can diced tomatoes, 15 oz.
1 can corn, 12 oz.
2 tbs. extra virgin olive oil
1 red pepper, diced small
1 green pepper, diced small
1 yellow onion, diced small
chili powder, at least 1/4 cup
4 or 5 slices jalapeno peppers, I like El Paso
1 tsp. cumin
1 tablespoon tabasco, sriracha* or other hot chili sauce
Salt to taste
1 bay leaf (make sure you remove this after Chili is done!)

Sauteed peppers and onions
  • In a dutch oven, break up and saute ground beef until it loses its pinkness.
  • Add tomato sauce and diced tomatoes and stir
  • In a separate saucepan, heat the olive oil and saute the diced peppers and onions. When soft and almost transparent, stir into beef and tomato mixture.
  • Add spices to taste
  • Using a potato masher, periodically crush the chili mixture as you cook it,that helps to thicken it
  • Taste, taste, taste as you go!
  • Simmer for as long as it takes to produce a thick chili
 * http://en.wikipedia.org/wiki/Sriracha_sauce


BBQ SHORT RIBS of BEEF
WOW is all I can say
This fine recipe has only two ingredients, and you don't need a barbecue. I originally saw Sunny Anderson (http://www.foodnetwork.com/sunny-anderson/bio/index.html) prepare something similar to this on the Food Network. It looked so good!  The only difference between my recipe and hers is that she made her own barbecue sauce, which you certainly can do. However, I found that a simple bottle of your favorite barbecue sauce, or my favorite, Sweet Baby Ray's (http://www.sweetbabyrays.com/) is certainly more than adequate. I also used short ribs of beef, instead of boneless ribs. All you need besides the beef and sauce is a working oven and some patience.  
When done, the meat just falls off the bone. So tender, so delicious!  

Ingredients:

1 dozen short ribs of beef
1 bottle (18 oz) Sweet Baby Ray's barbecue sauce, or your favorite brand, or your own recipe
3 hours of cooking time!
  • Preheat oven to 300 degrees
  • Place short ribs in a 9X13 stoneware, cast iron, or other heavy pan
  • Pour barbecue sauce over ribs
  • With hands or wooden spoons, depending on how squeamish you are, and toss ribs in sauce until fully coated
  • Cover with aluminum foil and bake for two and a half hours
  • Uncover and bake in order to caramelize, for additional half hour
  • Stir once more to coat with sauce
  • Serve hot!

Enjoy the game!


    Monday, January 10, 2011

    Post-Holiday Blues Biscotti: An after-holiday treat; our baking club

    Today I am deviating from my usual savory recipes to present one of my very successful baking endeavors:  pistachio-cranberry biscotti, which I have dubbed Post-Holiday Blues Biscotti.  Although I made them for Christmas, I have still  been enjoying them in this rather dismal snow and cold filled post-holiday period and they have made me feel a bit more festive. I always found biscotti fascinating and never could figure out how they got that lovely crescent shape, which tells you what kind of a baker I am.  I found out that it actually starts out as a loaf, and is then cut in 1/2 inch sections when done!  Duh! 
    Post-Holiday Blues Biscotti

    And that brings me to this:  I do not consider myself a baker, at least not yet.  I find that baking can be unforgiving: one tiny error and it is overdone, or underdone, or the chemistry is not right and it falls, or does something else unexpected and strange, and you have just wasted two hours of your time.  No amount of scraping or re-baking will help the product. Trust me.  On the other hand, cooking allows for the occasional error...the dish can usually can be salvaged or re-purposed with the right ingredient or technique. I have had a lifelong fear of baking and I have tended to avoid it most of my life.

    Venetians: Photo by Kelly Abel
    Lately though, I have discovered that I do love to bake, however, especially when it comes out perfectly.  I love the yummy fragrance of sweet or savory oven baked goodies and I especially love tasting and sharing them with friends and family.  I especially love the tools of baking: my stand mixer is a thing of beauty, and I love my rolling pins, my cookie cutters, my whisk. I love to mix cookie dough, and taste it: I love mixing a cake and watching it rise in the oven (through the oven window, of course!). I love the complicated: I recently mastered the Venetian, or rainbow cookie: it was a personal challege that I set up for myself, and I was so proud to gaze at the completed little bars, standing so proud like little soldiers on the cutting board.  The proof was in the pudding as they say: they came out great.

    BISCOTTI'S PROUD HISTORY: ITALY, OF COURSE
    Rome: Photo by Frank Rubino
    I did a little digging into the the history of the biscotti, I found that like ice cream, pasta, and other vital foods, biscotti are an ancient food originating in Italy, from Roman times.  I found a fascinating history from www.thenibbler.com. According to this account, the word biscotti is derived from Latin and means "twice baked." Dating back to before the fall of the Roman Empire,  it was a staple of the diet of soldiers and other travelers. Apparently some inventive baker found that baking the biscotti first, and then slicing and baking them a second time to dry them out, made them perfect for long journeys. After the culinary drought of the dark ages, the biscotti were revitalized during the Renaissance when an equally inventive Tuscan baker re-developed the recipe and served them to be dunked in sweet wine. Today, biscotti, are made with a variety of flavorings and ingredients, from classic anisette,to chocolate, and other flavorings, and chocked with almonds or other nuts, dried fruits and extracts. Biscotti are  served in Italy with wine or espresso, and in the USA with coffee, a far cry from the utilitarian food of the Roman Legion!

    THE BAKING CLUB
    Last year, my friends Nina, Josie and Pat were discussing how we don't see each other enough and realized we could get together once every couple of months and teach each other how to bake. So, that is how our "baking club" came into existence.  We rotated hostessing the club, and meet every few months. Two of our notable outcomes were a tiramisu, adapted from a recipe from a Patsy's Restaurant cookbook, and the recipe presented today, a holiday biscotti, adapted from a recipe created by Giada DiLaurentis. I have been making this biscotti recipe for the second year in a row, and so have my friends.

    POST-HOLIDAY BLUES BISCOTTI
    This biscotti is a lovely twice-baked little crescent, and has a festive Christmas-y look, with pistachios giving it some green, and dried cranberries giving it a bit of red. The cookie itself is sweet but not too sweet; it can be adapted for other flavorings such as anise to make classic anisette biscotti. It was very important to me to make the cookie, or biscotto, not as hard as commercial biscotti as I once broke a tooth on a particularly hard cookie.  Thus after the first bake,  they are sliced and baked only until they start to become lightly golden. Giada's recipe included a white chocolate dip and red and green sugar crystals to decorate them; this we felt was gilding the lily...there was no need!

    My beloved mixer
    Some tips: if you do not own an electric stand mixer, mix it by hand.  I burned out a perfectly fine hand mixer and had to cream the sugar and butter by whisk, and it came out fine.  The stand mixer is convenient and I love it and I did use it for my first batch,  but the hand mixer does not have a strong enough motor to mix the very thick cookie dough, which is what it actually is.

    Lemon zest and microplane
    Also, the lemon zest is an important part of the recipe. The best way to zest a lemon is to use a microplaner. There are hand zesters you can buy and they are alright, except some of them make these long strips which I do not think work as well.  A regular grater is kind of hard to use for zesting but it will do. Make sure you do not include any of the pith, or the white section of the lemon.  Usually one lemon makes one teaspoon of zest, which is what this recipe needs.

    And here is the recipe:

    Chopping those pistachios
    POST-HOLIDAY BLUES BISCOTTI
    Preheat oven to 350 degrees

    Ingredients:

    2 cups all purpose flour.  I like Unbleached King Arthur Flour
    1/2 teaspoons baking powder (not soda!!!!)
    3/4 cup sugar
    1/2 cup (1 stick) unsalted butter, at room temperature
    1 teaspoon lemon zest
    1/4 teaspoon salt
    2 large eggs
    Chopping those cranberries
    3/4 cup pistachios, chopped. DO NOT use a food processor, it will create too much "dust"!
    2/3 cup dried cranberries, chopped. Leaving them whole makes them too difficult to cut for the second baking. This was discovered by my friend Nina, in our baking club.


    Whisking the dry ingredients
    Mixing altogether
    • Line a large, heavy cookie sheet with parchment paper.
    • Spoon the flour into the measuring cup, use your hand to even it with the top of the cup,  and then sift using a sifter or a strainer into a medium bowl. Add the baking powder to the flour and use a whisk to blend.
    • Beat the sugar, butter, lemon zest and salt using a stand mixer or place ingredients in a large bowl and  use a whisk. Add eggs one at a time, beat until lemony yellow and blended. Add the flour mixture a bit at a time, and beat until just blended. Stir in the pistachios and cranberries.
    • Forming a loaf
    • Form the dough into a 13 inch log, about 3 inches wide, on the parchment covered cookie sheet. 
    • Bake until light golden for 40 minutes, or until it just begins to crack. If you wait too long, the cracks will be too large, although if you press it together after it is just done, it will be OK. 
    • Remove the loaf immediately from the pan and place on a rack or cool surface for about 30 minutes. You can use the parchment to move the loaf.
    • Baked and ready to slice
    • After 30 minutes, it should be fairly cool to the touch.  Using a sharp serrated knife, taking care not to ruin it by sawing too hard, cut into 1/2 inch slices. Arrange them cut side down  on the baking sheet, and return them to the 350 degree oven, baking for about 15 minutes until light golden.  Transfer them to a rack or cool platter and cool completely. 
    Slicing after baking
    These biscotti, if not overcooked, are tender-crisp, and will last in a tightly covered cookie tin for at least two weeks. They are delicious dunked in coffee or milk...somebody try the wine and let me know!

    Variations:  Anisette almond biscotti:  Instead of the lemon zest, pistachios and cranberries, add 1 tablespoon anise extract, and 1 teaspoon fennel/anise seeds, and 3/4 cup chopped almonds.

    Ready for second baking
    A friend asked me about sugar free options. There are some substitute sugars on the market, such as Spenda, that measure cup-for-cup for granulated sugar. If someone would like to try it and give me a review of your results, please be my guest!

    Done!
    The completed product is such a delight: if this doesn't lift your spirits and get you past the post holiday blues, well, I just don't know what to tell you.

    Thursday, December 9, 2010

    Macaroni with Winter Squash: The Squash Contest


    MACARONI WITH WINTER SQUASH

    I want to share a savory winter recipe this time that is quite unusual but quick and easy to whip up on a cold winter night. It is a traditional Neapolitan pasta dish using sweet, pureed yellow winter squash. I do not think you will see it anywhere else: I have searched.

    THE SQUASH CONTEST:
    Varieties of Squash: Butternut, Sweet Potato Squash, Acorn
    This year, to determine the best squash to use,  I decided to have a squash contest. What other kinds of squash could I use? Which squash is sweeter? Which kind best lends itself to the savoriness this dish requires?  I went to the farmer's market at the tail end of the season and settled on a nice sized butternut squash, a sweet potato squash, and a lovely green acorn squash. Other squashes were simply not appropriate, so I limited the contest to those three.

    BUTTERNUT SQUASH
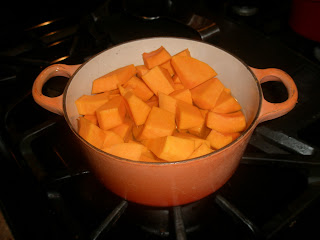
    The butternut is oblong, or pear shaped, with a long throat and bulbous end, and has a pale light beige exterior. It is hard as a rock but because the outside is smooth it is fairly easy to peel, remove the seeds, and cut into cubes.  It cooks in water to a soft consistency in a very short time. The flesh is a rich, creamy bright orange-yellow and maintains its color once cooked. It is very sweet but not cloying.

    SWEET POTATO SQUASH
    This variety was highly recommended by the vendor at the Saratoga Farmer's Market, where I bought the other two varieties.  The skin is bright yellow with green or orange stripes.  It was easy to peel, and the flesh was very pale. The seed cavity ran the whole length of the squash.  It cooks very quickly. I found the flesh to be very potatoey once cooked...not very sweet. It would probably jazz up mashed potatoes but in this recipe, it left a lot to be desired. Farmer's Market people, wrong!!

    Notice the difference in color: Top: Butternut. Bottom: Sweet Potato
                                                                                           ACORN SQUASH
    Acorn Squash
    The acorn squash, shaped like, yes, an acorn, I found to be a very difficult fruit (yes, its a fruit!).  My husband and I almost amputated some body parts trying to peel and slice the thing.  Somehow we managed to etch the stubborn peel out of the crevices, scoop out the seeds and stringy interior, and cut it into cubes.  Then, backwardly, I found out that NO ONE peels these things, you are supposed to cut it in half and bake it in the oven, and scoop it out, it is that difficult. Then, I find out that cooking it in water will compromise the taste. Well, now I had this cubed squash, what to do? I decided to add just a bit of water and see how that worked. I placed it in the saucepan and watched it very carefully. It cooked in about 5 minutes. As soon as the water evaporated, it was tender and easy to mash. However, it also lost its creamy color and had developed a strange orangy greenish color which admittedly was not too appetizing.  However, it was super sweet and delicious and the taste, at least,  complemented the recipe well.

    THE WINNER:
    Which squash won? The butternut, of course!  Looks count for something, and it is so delicious. You need not only the sweet taste but you also need that sunny yellow color!

    Here is the recipe:

    MACARONI WITH WINTER SQUASH

    Ingredients:


    1 large butternut squash
    1 lb any shape pasta,  such as ziti, gemelli,  or even spaghetti
    2 cloves garlic, sliced
    water
    1/2 cup low sodium chicken broth (optional)
    1 tbs canola oil
    1 tsp extra virgin olive oil for taste*
    butter (optional)
    salt
    pepper
    Grated romano pecorino cheese
    Chopped fresh parsley
    • Peel the squash using a downward motion, then cut it in half lengthwise. Made sure you remove all the peel down to the flesh.  Scoop out the seeds and stringy material and discard.  Cut it into small cubes and place them into a pot of boiling water. Cook until tender, 5 to 8 minutes. Drain and place into a bowl, and mash with a fork or potato masher. Set aside.
    • Boil water for pasta and cook according to package directions. 
    • Into a cold saucepan, place canola oil and garlic, and cook on a medium flame for a minute or two and do not brown, or it will be bitter. Place squash mixture in pan, and stir, taking care as it may sputter due to its thickness.  You may add the low sodium chicken broth, a bit at a time, until it is a smoother, looser consistency. Add salt and pepper to taste. If you want, you can add the teaspoon of oil and a bit of butter. Taste as you go!!
    • Drain pasta when it is al dente. Place either in individual dishes or one large bowl, and top with enough sauce to coat the pasta well.  Top with grated cheese and parsley. It is a rich, sweet and savory dish, toasty warm and perfect for a winter's day. 
    This is what the sauce will look like when done

    Finished!
    *I recently read an article in the NY Times stating that extra virgin olive oil loses or changes its taste when you heat it, and you are better off using an oil like canola for cooking, and use the extra virgin olive oil to flavor the dish afterwards. Much more economical!   Please check it out :

    http://www.nytimes.com/2010/11/17/dining/17curious.html?_r=1&scp=3&sq=olive%20oil%20loses%20taste&st=cse

    This is a busy season, and sometimes I am too busy cooking to write about it!  However, I do look forward to sharing more of my dishes with you, and I especially look forward to reading your comments, which is easier to do as now you do not have to sign in any more.  I also appreciate it if you sign up as a Follower or Friend.

    Enjoy the season, and remember the reason!

    Monday, November 15, 2010

    Broccoli Rabe, Pasta and Sausage

    A few weeks ago, my husband and I and a few friends went to Arthur Avenue, Little Italy in the Bronx for those of you who are not familiar, and dined at Mario's Restaurant (Check out this link: www.mariosrestarthurave.com) I had a lovely eggplant dish which I enjoyed, but I was curious about another dish that was ordered,  broccoli rabe and sausage, with rigatoni.  For such a special and supposedly flavorful dish, it looked a bit plain, so I thought: I would do some research and create a Broccoli Rabe, Pasta and Sausage dish that will be a party in the mouth, with enough spice to enhance the flavorful vegetable and sausage without overwhelming them.

    I think I was successful. I did a thorough search of both internet and cookbook recipes and created a lovely dish that I think fits the bill.  No offense to Mario, though, we all enjoyed our food:  I just wanted to tinker!

    Broccoli rabe is an acquired taste. I do not think there is not one child on earth who will go within ten feet of it; the bitterness scares them. Many adults not of the Italian persuasion, and some who are,  think it is awful.  I used to hate it but now I LOVE it.  I found, however, I love it better when it has been pre-cooked, or blanched. That takes some of the bitterness out of it and makes it tender.

    Check out my note at the end of the ingredients below: if you hate broccoli rabe, just simply cannot bear it, you can substitute! It works well.

    Some of the recipes called for one pound of sausage, which would have made the dish way too rich.  Also, to avoid the bland pasta, I used very good pasta imported from Italy, the kind in the cellophane bag that almost looks fresh. It is not completely dried, in fact, the ingredients listed on the package include semolina and water. Regular boxed pasta, which is good for most uses, are completely dried.

    I chose the brand Tarall'oro bought at Fairway and used a shape called Oreccheitte Caserecce.  Orecheitte means "little ears", and yes, that is what they look like. Caserecce means homemade, and they do look homemade!  They also look like little hats. Very cute.


    I used to think that it didn't matter about the shape, pasta was pasta. Not true!  They differ in how they handle the various sauces.  I also used a method of cooking that I do not normally use, that I always see on the cooking shows but never really did,  which is to cook the pasta part way, about 3/4, and finish the rest in the pan.  I found that the pasta cooked in this way absorbed the juices from the vegetables, meat, broth and wine and other flavorings and lent a creaminess to the dish.  I tell you, it was all I could do not to completely inhale the dish before I served it, it was that good!!!


    BROCCOLI RABE, SAUSAGE, AND PASTA

    1/2 pound Italian sweet pork sausage, out of casing ( some markets sell patties so you don't have to take them out of the casing)
    1 pound Italian imported pasta, orecheitte or something similar)
    1 bunch broccoli rabe, chopped and large stems removed, blanched, drained, and set aside.
    I medium onion, sliced
    3 cloves sliced garlic
    1 cup dry white wine
    1 cup beef broth
    2-3 tablespoon fresh chopped flat leaf parsley
    1 teaspoon fresh oregano or 1/2 tsp dried oregano (I like Wild Sicilian Oregano, look for it)
    1 teaspoon dried thyme
    Extra virgin olive oil
    Salt, pepper to taste
    Red pepper flakes to taste
    Pecorino Romano grated cheese

    Note: If you REALLY REALLY hate broccoli rabe, you can use broccoli, broccoletti, escarole, swiss chard, or even spinach for this dish.
    • Cook pasta in salted water until 3/4 done. It should be harder than al dente.  Reserve in bowl, sprinkle with olive oil and stir to avoid sticking.
    • Blanch the broccoli rabe: Boil water in a medium saucepan, and place the broccoli rabe in the water until just wilted. Drain well and set aside.
    • Remove the sausage from the casing and break it up into small pieces. You can use your fingers or an old fashioned potato masher. Heat a large, high sided (12") saute pan, and cook the sausage until browned but not crispy. Reserve.
    • In the sausage fat and some olive oil if necessary, saute sliced onion until brown and carmelized but not crispy or burnt, saute about 4 or 5 minutes. Add the sliced garlic about halfway through to avoid overbrowning. Add red pepper, salt and pepper. 
    • Add the liquids: add the wine to the onion/garlic mixture in the pan and reduce to half. Add the broth and the sausage and reduce until thickened. 
    • Add broccoli rabe, the rest of the herbs and spices, and stir to combine, cook about 5 minutes.
    • Add pasta to mixture, cover and cook until al dente or to taste. You might have to add some water, I reserve some of the pasta water for this purpose, it will thicken the dish more so than plain water.
    • Correct for taste: make sure you use enough salt!
    For garnish: Romano cheese for a kick, Parmigiana for a more subtle flavor. You can use a spoonful of Ricotta cheese and some more fresh parsley:  pretty and delicious!

    Next time I am going to introduce to you a surprisingly odd but delicious fall dish: Pasta with yellow winter squash, subtly flavored with garlic. This is a family recipe: I have never seen it anywhere else, so I think it is pretty special, and I think you will enjoy it.  This week I am experimenting with butternut, acorn or sweet yellow squash to see which is best.

    Happy Thanksgiving!

    Thursday, October 21, 2010

    Oh, that fennel: Pasta with breadcrumbs!

    These past few weeks, I set about to create a dish that was remembered from long ago: a traditional Sicilian dish, pasta with breadcrumbs or Pasta con Pangrattato.  My first attempt was a result of family and friend discussions, internet and cookbook  research. The recipes mostly called for anchovies, breadcrumbs, olives, capers, and olive oil, as well as seasonings. I used store-bought unflavored breadcrumbs from an Italian bread bakery.  The result was tasty but just OK.  The breadcrumbs had a sandy texture, the flavor was savory but was too subtle. The olives and capers were fine but we felt there was too much going on. We were looking for something that was delicious and savory, but simple. I couldn't go overboard with the anchovies I am the only one in my family who enjoys them. So I set out to make a breadcrumb mixture that could stand on its own without the sharp anchovy flavor.

    One suggestion to improve the breadcrumb texture was to make breadcrumbs the old fashioned way: hand grating.  I cut up some leftover Italian bread and let it sit a few days in a brown paper bag. With the use of a repurposed meat grinder, we grated the rock-hard bread. The resulting crumbs were not uniform, as they are when store bought, which I thought should improve the texture. I put it away for the next day. That night, I did some more research and then heard from my friend Mary Ellen, who is Sicilian, and found that in this dish, which is a traditional dish made for St. Joseph's day in March, calls for the use of fennel leaves in the pasta water! I never heard of such a thing, and I had those pretty fronds that I packed away a few days ago, left over from the fennel dish I discussed in my last blog post. I couldn't believe it. It is supposed to give a very subtle flavor, I couldn't wait to try it.

      The next day, I  gathered all the other ingredients together:
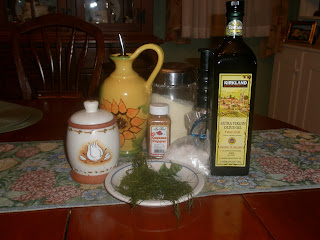
    Pictured: the fennel fronds, garlic, olive oil, cayenne pepper, Sicilian sea salt, and Pecorino Romano cheese and basil leaves for garnish. I decided to use Barilla fettucini for the pasta.

    I "dry-fried"  2 cups of the crumbs, which means that no fat was used in a hot pan, until they were golden brown. Dry-frying them maintains crispness.  I also separately  "dry-fried" 2 cloves of garlic, chopped fine, until they were golden and crispy but not burnt. After the crumbs were done, I added seasonings and then added enough olive oil so that the crumbs clumped together. Please season to taste! Taste until the seasonings are to your satisfaction. Try not to over-salt since you will be adding cheese to the final dish This is what the crumbs looked like, nice and brown:
    While doing this, I got the water for the pasta to a rolling boil, and added salt, and then the fennel fronds until they gave off a lovely fragance. I let them boil for about 5-10 minutes. I use a drain insert in my pasta pot, so I pulled the fronds out and discarded them. I then added the pasta and cooked them until they were al dente.

    I tossed the crumbs together with the pasta in a large bowl.  I sprinkled the cheese over the pasta, and some lovely basil leaves for garnish. At the end, I drizzled olive oil over all.

    It was very tasty: a satisfying crunch from the breadcrumbs, savory from the garlic and cayenne pepper and salt, and because of the olive oil, the crumbs adhered well to the pasta. And the fennel: there was a subtle taste, not to mention that my kitchen had a wonderful fragrance!!!


    Pictured above is an individual serving...take my word for it, it was delicious and very easy to do!

    As I mentioned, we had a great time drying the bread, and grinding it in our hand-grinder. The results were amazing!  However...I visited our new Fairway Market in Pelham NY a few days later and found an interesting product: Artisan crumbs!!! Just like our crumbs, they varied in size, and used in another dish, were virtually the same. So if you do not have time to dry the bread, find an old grinder, and grind the bread, you can just visit the Fairway! Here is the link: www.fairwaymarket.com. Like Stew Leonard's, Fairway is a carnival of food...if you love to shop like I do, and some people do, going through those aisles is both entertaining and enlightening.

    Anyway I would like to remind you all that I really appreciate your comments, however I get them. Many people find it confusing as to how to post on this blog, but it is quite simple: just sign in to Google or Yahoo, or if you don't have an account, just sign up which just requires some simple information. You don't have to use their email or any other service. With feedback, I can improve or add to my blog. Any suggestions, recipe requests or criticisms will be most appreciated!!

    Happy Fall, everyone!